

A Housewife, or Hussif, is nothing more than an 18th century sewing kit. Women used them at home, and soldiers used them when serving in the military. A few years back, I made one for myself, and use it mostly at re-enactments and museum programs. It’s a very handy thing to carry, and a very easy thing to make. All you need is some appropriate cloth, and simple directions. Here’s how I make mine.
Materials
Several 1/2 yard lengths of period appropriate cloth, in various patterns. I like checks. Alternatively, you can use a single color, if you prefer.
2 yards of seam binding or bias tape, or you can make your own.
Matching thread and sewing needles.
Plastic cover from a 15 ounce margarine container.
Instructions:
Cut the following:
A. Plain color lining piece – I generally use muslin. Cut to 4″ x 11″.
B. Backing piece: fabric of your choice. Cut to 4″ X 11″.
C and D: For pockets: Cut two 3 1/2″ x 4″ pieces;
E. Cut one 4″ x 5″ pocket piece
F. Round the tops of the lining and backing, tracing the arc with the margarine lid. If desired, cut a liner piece for the curved top.
Assembling
1. Using a neat slip stitch, hem 1 long side of pieces C and D. The hem should be narrow – approximately 1/8″ folded twice.

2. Hem 1 short side of piece E similarly.
3. Lay the lining (A) right side up with the rounded edge to the top. Place piece E, also right side up, so that its cut edges are even with the rectangular end of the lining. This will become the lowest pocket. Bast E in position, leaving hemmed edge free.

4. Place piece C, right side up, on the lining with its hem touching the hem of piece E. Carefully fold under 1/4″ of the other end of C. Baste C in place, and carefully slip stitch the folded over side to the lining
5. Place D, right side up, on the lining with its hem toward the rectangular end, and approximately 3″ away from the hemmed end of C. Carefully fold under 1/4 ” of the other end of D. Baste D in place, then slip stitch the folded under edge to the lining.
6. Place the lining/pocket over the cover piece (B), matching up the edges. Baste together. Trim away any excess material from the edges.
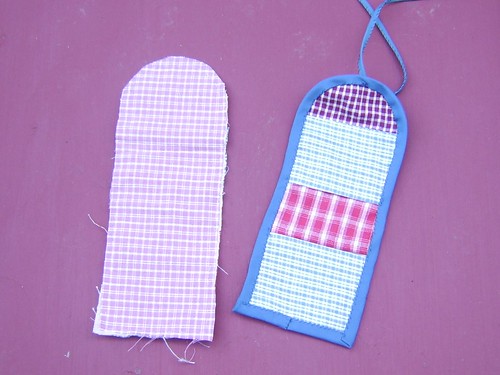
7. The binding tape is sewn around the edges, beginning at the center of the rectangular end. You can sew through all the layers at once with small running stitches, or slip stitch each side separately. Be sure to miter the corners, and overlap neatly at the bottom.
8. Attach a length of binding tape or ribbon on the exterior to serve as a tie to hold the folded case closed. One third should lie on top of the case, and 2/3 away from the case.
This case can be folded in a variety of ways, depending on how full it is. You can also roll it. Fill it with needles, threads, pins, and any other small objects that you need for sewing. Show off your beautiful new “hussif”!

Good to see items like this being shown. I made one of these about 15 years ago, and it is still in my pack.
Regards, Keith.
LikeLiked by 1 person
Thanks, Keith! They certainly are useful.
LikeLiked by 1 person
I found your blog on google and read a few of your other posts. I just added you to my Google News Reader. Keep up the good work. Look forward to reading more from you in the future.
LikeLiked by 1 person
Thank you for your kind comments! I’ll check out your site as well.
LikeLike
Reblogged this on Janet's Thread 2.
LikeLike